Drum December Day 12: Mastering the 6-Clamp Method
Welcome to Day 12 of Drum December! Today is the day we tackle dry-bending and clamping head-on. In this tutorial, you’ll learn the vital “what-to-dos” (and the painful “what-not-to-dos”) of securing your frame.
Clamping hardwood is a bit like attending your grandmother’s third wedding and being asked to dance by a gentleman who took lessons from Chubby Checker. Just like a dancer from the ’60s, the wood keeps trying to “Twist.” By following my innovative 6-Clamp Method, you’ll have no problem taking the lead in this clamping dance.
The Anatomy of the Dance: Twist and Circularity
When making drum frames, there are two primary style considerations you must face:
- The Twist: How much natural “sport” or torsion your finished frame will carry.
- The Shape: How perfectly circular or organic you want your finished drum to be.
Both of these decisions are finalized during the clamping stage. This is exactly why I developed the 6-Clamp Method—to give the maker total control over the wood’s final expression.
Avoiding the Tangled Clamp: The Staggering Method
In Day 11, I explained how the shape changes depending on which end overlaps on the outside. Today, we focus on the direction of the clamps.
Because you are using six heavy-duty C-clamps in very close proximity, the handles can easily get stuck against each other. It can be a deeply frustrating process! Below is a video of my own experience trying to turn clamp handles that weren’t staggered. If you find it painful to watch, just imagine being the one trying to turn them under pressure!
To solve this, we stagger the clamps—top and bottom—in a disciplined sequence. This allows us to intricately pull the seam together while “reading” the bend and twist of the frame.
The 6-Clamp Sequence: A Step-by-Step Guide
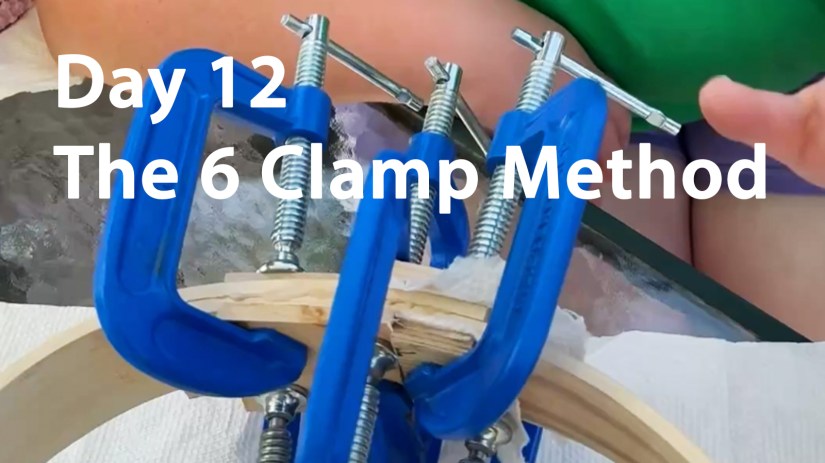
I have created this incremental schematic to show you the exact order of operations. Note how each clamp is placed to manage the tension of the 3″ to 5″ glued seam:
- Clamp #1: Placed on the top, dead-center of the seam.
- Clamp #2: Placed directly beneath the first, but facing the opposite direction.
- Clamps #3 & #4: Placed on the side of the center clamps closest to the inner board end.
- Clamps #5 & #6: Placed on the remaining opposite side.
Shaping with Baffles: Controlling the Curve
In the schematic video above, I omitted the cutoff baffles (the hardwood blocks that protect your frame) for clarity. However, you must use them!
The size of the baffle on the inside of the frame actually alters the drum’s final shape.
- The Standard: I typically use a 1″ x 3″ piece of oak.
- The Adjustment: If you want to flatten a side or create an egg-shaped drum, you do this by widening the inner baffle. The wider the baffle, the flatter that section of the frame becomes.
- The Rule of Thumb: I generally use a 1″ wide piece on the inside and a 2″ wide piece on the outside, adjusting the spacing as I feel the wood react.
The Goldilocks Grip: Just Enough Pressure
By alternating your clamps, you aren’t just preventing a handle jam—you are managing the twist. When the first clamp goes on, you can adjust the shift and slide of the frame. The second clamp adds stability, and clamps three through six do the heavy lifting.
Tighten them as firmly as your hand can turn—no need for tools. You are looking for the glue to “squeeze out” evenly along the seam. Be careful not to over-tighten! If you squeeze out too much glue, you’ll create a “starved” joint. This results in a fragile frame that may snap when the powerful tension of the rawhide eventually pulls it into its final form.
Looking Ahead
If you think a tree has a long memory, just wait until you see the nature of rawhide. Keep following the Drum December series to see how we work with animal skins in the coming days.
Even if you never pick up a clamp yourself, I hope you’ve learned how to straighten out “The Twist.” Just start in the middle of the floor and lead your partner—side-stepping and swaying until the song is done and you both become one with the true drumbeat of life.
See you tomorrow for Day 13!
Read more about my art at Love Art By Po and the many drums I make.
One response to “Drum December Day 12 – How to Make a Drum Frame Using 6 Clamps”
-

[…] Day 12: The 6 Clamps Method […]
Find Love Art by Po’s Portia “Po” Chapman Kingston Art studio on Google Maps at this link.

Let Me Know What You Think! Start or Join the Convesation