Behind the Art, Behind the scenes, Drum December, Drum Works, How Po Makes Hand Drums, Indigenous Art, Kingston Artist, Po's Drum Making Process, Portia Chapman, Portia Po Chapman Frames and Stretchers, Real-Time Crafting, Studio Process, Uncategorized

Drum December Day 13 – Beyond the Clamps: Wrapping the Summer Bend for a Winter Reveal

Close-up of a wood drum frame with blue C-clamps attached, sitting on grass, from the "Drum December Day 13 Summer Bend Ready For Winter Reveal" blog post by Portia Po Chapman.
Clamped wood drum frames from the summer bending sessions, ready to be finished in the winter studio.

Beyond the Clamps: Wrapping the Summer Bend for a Winter Reveal

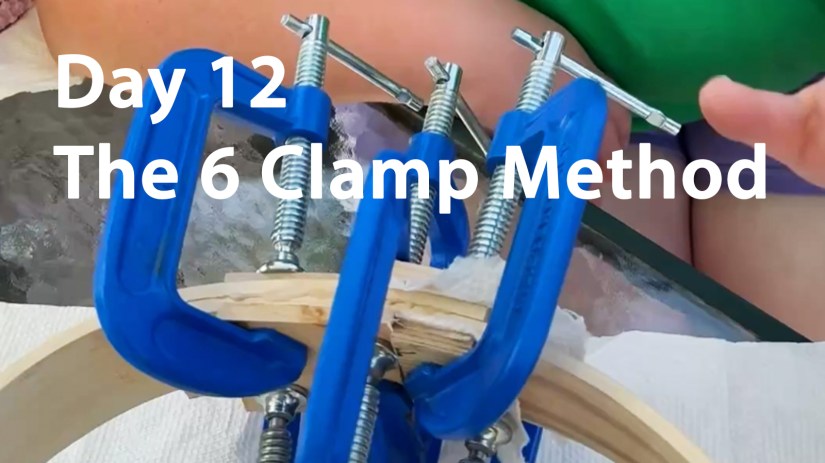
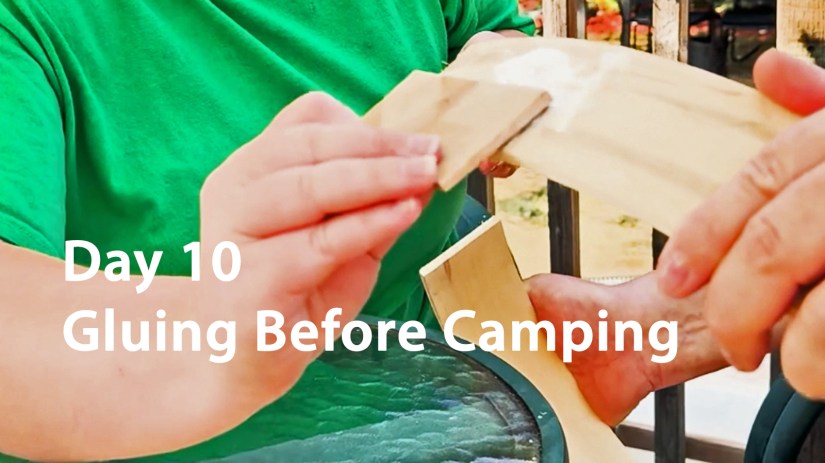
We have reached Day 13 of Drum December. Using my innovative dry-bend technique and the disciplined 6-clamp method for freehand organic formation, the drum frames are now set. They have been glued and secured into their unique shapes and sizesโ€”now, we must give them the gift of time.

The Art of the Cure

In the heat of the summer, I prefer to hang the clamped frames in the maple tree at the Love Art By Po studio. Iโ€™ve found that the blazing summer sun and a hot woodshop can be too aggressive; the glue and wood need to work their magic at their own pace. This stage cannot be rushed.

Whether they are hanging in the cool shade of a tree or resting in my humidity-controlled studio, the environment must be just right. To ensure the wood “remembers” its new shape without stress, I maintain these optimal conditions:

  • Temperature Range: 18โ€“27ยฐC (65โ€“80ยฐF)
  • Humidity: 55%
  • Lighting: Reduced UV exposure with dappled, indirect sunlight

More Than Craft: The Living Drum

Once dry, the frames move into my controlled environment for about 30 days. But this isn’t just storageโ€”it is an introduction. I bring them into a living space filled with family conversation, singing, and music. I introduce them to their “sister drums” by playing the finished drums that surround them.

Some might think of drum making as simple carpentry, like crafting a coffee table, but the wood tells a different story. If you do not acknowledge their living nature, they rebel. For years, I heard stories of drums as family members who “talk” in their own ways. I never truly comprehended how that was possible until I began making them myself. Now, I know the truth: Drum making, most assuredly, becomes LIFE.

The Pivot: Moving to Real-Time

Today is December 21, 2025. Our summer-bent frames have dried, been unclamped, and are fully conditioned to the spirit of my studio. Starting tomorrow, Day 14, we leave the archives behind and move into real-time.

We are officially on a countdown to New Yearโ€™s Eve. To drum in 2026 with a newly finished piece, I must have the rawhide strung by December 27. Rawhide requires three days to dry in perfect conditions, and with the shifting winter weather outside my stringing studio, this will be a true nail-biter.

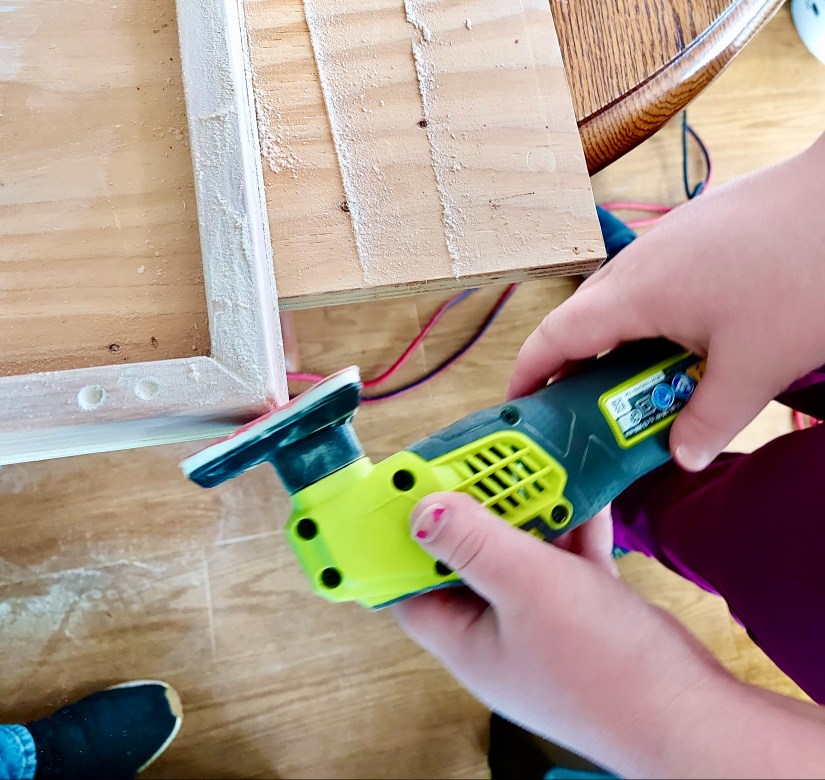
Nature will do as Nature does, and the drum is a part of that natural world. Join me tomorrow for Day 14 as we step into the workshop to begin the sanding and finishing.

See you in the studio!

See you tomorrow for Day 14!

Read more about my art at Love Art By Po and the many drums I make.

To contact me directly, please use this email:

๐Ÿ“ง Portia@loveartbypo.ca

Let Me Know What You Think! Start or Join the Convesation

Find Love Art by Po’s Portia “Po” Chapman Kingston Art studio on Google Maps at this link.

Behind the Art, Behind the scenes, Drum December, Drum Works, How Po Makes Hand Drums, Kingston Artist, Po's Drum Making Process, Portia Chapman, Portia Po Chapman Frames and Stretchers, Studio Process, Uncategorized, woodworking

Drum December Day 12 – How to Make a Drum Frame Using 6 Clamps

Close-up of several blue C-clamps tightly securing a glued joint on a wooden drum frame using the 6-clamp method, Day 12 tutorial by Portia Po Chapman.
Mastering the “6 Clamp Method” to ensure a secure, even bond on the dry-bent drum frame.

Drum December Day 12: Mastering the 6-Clamp Method

Welcome to Day 12 of Drum December! Today is the day we tackle dry-bending and clamping head-on. In this tutorial, youโ€™ll learn the vital “what-to-dos” (and the painful “what-not-to-dos”) of securing your frame.

Clamping hardwood is a bit like attending your grandmotherโ€™s third wedding and being asked to dance by a gentleman who took lessons from Chubby Checker. Just like a dancer from the ’60s, the wood keeps trying to “Twist.” By following my innovative 6-Clamp Method, youโ€™ll have no problem taking the lead in this clamping dance.


The Anatomy of the Dance: Twist and Circularity

When making drum frames, there are two primary style considerations you must face:

  1. The Twist: How much natural “sport” or torsion your finished frame will carry.
  2. The Shape: How perfectly circular or organic you want your finished drum to be.

Both of these decisions are finalized during the clamping stage. This is exactly why I developed the 6-Clamp Methodโ€”to give the maker total control over the woodโ€™s final expression.

Avoiding the Tangled Clamp: The Staggering Method

In Day 11, I explained how the shape changes depending on which end overlaps on the outside. Today, we focus on the direction of the clamps.

Because you are using six heavy-duty C-clamps in very close proximity, the handles can easily get stuck against each other. It can be a deeply frustrating process! Below is a video of my own experience trying to turn clamp handles that weren’t staggered. If you find it painful to watch, just imagine being the one trying to turn them under pressure!

To solve this, we stagger the clampsโ€”top and bottomโ€”in a disciplined sequence. This allows us to intricately pull the seam together while “reading” the bend and twist of the frame.

The 6-Clamp Sequence: A Step-by-Step Guide

I have created this incremental schematic to show you the exact order of operations. Note how each clamp is placed to manage the tension of the 3″ to 5″ glued seam:

  1. Clamp #1: Placed on the top, dead-center of the seam.
  2. Clamp #2: Placed directly beneath the first, but facing the opposite direction.
  3. Clamps #3 & #4: Placed on the side of the center clamps closest to the inner board end.
  4. Clamps #5 & #6: Placed on the remaining opposite side.

Shaping with Baffles: Controlling the Curve

In the schematic video above, I omitted the cutoff baffles (the hardwood blocks that protect your frame) for clarity. However, you must use them!

The size of the baffle on the inside of the frame actually alters the drum’s final shape.

  • The Standard: I typically use a 1″ x 3″ piece of oak.
  • The Adjustment: If you want to flatten a side or create an egg-shaped drum, you do this by widening the inner baffle. The wider the baffle, the flatter that section of the frame becomes.
  • The Rule of Thumb: I generally use a 1″ wide piece on the inside and a 2″ wide piece on the outside, adjusting the spacing as I feel the wood react.

The Goldilocks Grip: Just Enough Pressure

By alternating your clamps, you aren’t just preventing a handle jamโ€”you are managing the twist. When the first clamp goes on, you can adjust the shift and slide of the frame. The second clamp adds stability, and clamps three through six do the heavy lifting.

Tighten them as firmly as your hand can turnโ€”no need for tools. You are looking for the glue to “squeeze out” evenly along the seam. Be careful not to over-tighten! If you squeeze out too much glue, youโ€™ll create a “starved” joint. This results in a fragile frame that may snap when the powerful tension of the rawhide eventually pulls it into its final form.

Looking Ahead

If you think a tree has a long memory, just wait until you see the nature of rawhide. Keep following the Drum December series to see how we work with animal skins in the coming days.

Even if you never pick up a clamp yourself, I hope youโ€™ve learned how to straighten out “The Twist.” Just start in the middle of the floor and lead your partnerโ€”side-stepping and swaying until the song is done and you both become one with the true drumbeat of life.

See you tomorrow for Day 13!

Read more about my art at Love Art By Po and the many drums I make.

๐Ÿ“ง Portia@loveartbypo.ca

Let Me Know What You Think! Start or Join the Convesation

Find Love Art by Po’s Portia “Po” Chapman Kingston Art studio on Google Maps at this link.

Behind the scenes, Drum December, Drum Works, How Po Makes Hand Drums, Kingston Artist, Po's Drum Making Process, Portia Chapman, Portia Po Chapman Frames and Stretchers, Portia's Adventures, Studio Process, Uncategorized

Drum December Day 10 | How to Glue Before Clamping Drum Frame

On day 10 of Drum December, Po spreads glue on the white oak before clamping the drum frame to dry. Her assistant holds the frame firmly still at the Love Art By Po Kingston Art Studio
Drum December Day 10 – Po Glues the White Drum Frame Before Clamping the Dry-Bend

Choosing the Right Glue for Handcrafted Drum Frames | Drum December Day 10

At the Love Art by Po studio in Kingston, I believe that building a professional-grade drum frame is as much about the type of glue as it is the technique used to apply it.

Different moisture levels in wood require different chemical bonds. Whether you are working with freshly steamed “green” wood or seasoned dry wood, choosing the wrong adhesive can compromise the sound of your instrument. In todayโ€™s update, Iโ€™ll explain how to pick the right glue at your local hardware store to ensure a lifetime of pure sound.


The Challenge: Gluing Damp vs. Dry Wood

The first hurdle every drum maker faces is moisture. If you are bending steamed red oak, the wood is naturally damp.

Early in my practice as an installation artist, I treated drum frames like standard carpentryโ€”LePage Pro Carpenterโ€™s Glue. However, standard wood glue and damp, steamed wood do not mix. I would return to my shop table the next morning to find the joint “slimy” and uncured on the inside.

The Polyurethane Solution

To glue damp wood effectively, you need a moisture-activated adhesive like Original Gorilla Glue. This polyurethane glue uses the moisture in the wood to “activate” the bond. It bonds damp frames like a dream, but it comes with a significant trade-off: The Foam.


The Science of Sound: Why “Foaming” Glue Causes Rattle

If you want a pure, resonance-free tone, you must understand how glue affects vibration. Polyurethane glue expands into a foam, creating tiny air pockets within the joint.

Are Drum Frames Meant to Rattle?

  • The Rattle: If you enjoy a “smooth rattle” or mechanical reverberation, foaming glue is your best friend.
  • The Pure Tone: If you want a clean strike, never use foaming glue. The drum frame produces sound just as much as the rawhide. If your glue joint contains air pockets, the vibration of the drum strike can cause a “seam rattle” deep within the wood.

How to avoid the rattle:

  1. Glue the frame only when the wood is fully dry.
  2. Use a non-foaming moisture-resistant glue like Gorilla Glue Clear. (Note: “Non-foaming” glues can be slippery, making clamping a damp frame more difficult.)

Three Steps to a Rattle-Free Steamed Frame

If you are new to drum making, remember that hitting a drum with “enthusiastic force” will eventually shake loose any weak or brittle bonds. To ensure your steamed frame remains silent and solid, follow these three steps:

  1. Cooling Time: Let the wood cool until it is no longer steaming, but is still slightly damp before applying glue.
  2. Even Spread: Use a non-foaming polyurethane glue spread evenly across the entire joint.
  3. Pressure: Use 6+ C-clamps, applied two at a time on opposite sides to ensure even compression.

Innovating with Dry Wood Bending

For my premium drums, I prefer to glue the wood when it is fully dry. This produces a beautiful, rattle-free instrument. However, dry hardwood doesn’t like to bendโ€”it behaves like a floor plank!

To solve this, I developed a proprietary dry-bending technique. The wood is pre-bent and shaped before the glue is ever applied. You can see the foundation of this technique in my previous posts: Day 5, Day 7, and Day 8.

My Go-To Choice: Titebond III

For dry, single-layer frames, I recommend Titebond III Ultimate.

  • Why? It offers a longer working time, becomes “tacky” quickly for better clamping, and is rated for both interior and exterior use.
  • The Secret: Let the wood and glue “perform their magic” for at least 24 hours before sanding or knocking the frame.

The “Drum Making Golden Rule”

Frame drums are built for lifeโ€”they go from drizzling rain at a community circle to the dry heat of a bonfire. Because they are exposed to moisture, heat, and travel, your glue must be waterproof.

The Golden Rule:

No matter the purpose of the drum, ALWAYS use a high-strength, waterproof glue that produces zero (or nearly zero) bubbles.


Coming Tomorrow: Join me for Drum December Day 11, where Iโ€™ll share a deep-dive tutorial on Professional Clamping. I’ll show you the “tricks of the trade” to ensure your frame is perfectly circular and structurally sound.


See you tomorrow!

More information about Love Art by Po Drums

๐Ÿ“ง Portia@loveartbypo.ca

One response to “Drum December Day 10 | How to Glue Before Clamping Drum Frame”

  1. Drum December Day 11 – How to Clamp a Drum Frame – Love Art by Po Avatar

    […] Welcome back to Drum December! Today, we are diving into one of the most transformative stages of the process: using my innovative dry-bending technique to compress and clamp the drum frame. This method is born from my preference for non-polyurethane glues, which we explored in our Day 10 tutorial. […]

Let Me Know What You Think! Start or Join the Convesation

๐Ÿ“ Visit the Studio:Find Love Art by Po on Google Maps


Portia Chapman, Portia Po Chapman Frames and Stretchers

Behind the Scenes: Building Frames and Stretchers

Portia Po Chapman On Making Frames and Stretchers

Behind our favourite paintings exist an unseen construction that without, much of the art world would remain rolled up and stuffed under artists’ beds.

Transportable paintings need mounting materials.

How tight to stretch a canvas varries in options almost as the number of artists who use them. I still like to use a dollar store stretched canvas and water stained, a warted canvas board in a pinch. Us artists just have to create. Even an old bed sheet held down on the grass with rocks will satisfy our needs at times.

I grew up in a home adorned by ongoing art projects. As children, our drawings on the walls were never punished. My parents didn’t even pick up a bottle of cleaning spray. My parents would be so proud. You’d think a scribble I did on the foyer wall was their new Mona Lisa.

I was always welcome, no matter how young, to sit in on adult oriented art events and courses. One time, my dad gave the participants each a cup of black paint, a brush and led them to an inner foyer of our home. I walked proudly with my cup and brush. When we all entered the room, he instructed about 8 of us, “Paint.” The class was aghast at the instruction. Confusion as to what and where was accompanied by a laughter and a dash of delirium. What surface should we paint? When everyone just stood there shoulder to shoulder in an oblong egg shaped formation, he took my cup and brush and painting a long swath across the wall. “Here, now paint! Let the spirit of creativity move you.” You see, he had been planning this exercise for months without telling anyone. The walls were stuccoed and sealed with an opaque, non-script grey. I hated those grey walls. After that night of painting, a really special energy adorned that space. It was impossible to enter his studio without walking through it. That night, as a community of creators, we created a creation that greeted hundreds of people. Behind that collective art piece was a prepared framing of what would be a very special welcoming space. After a few years, it hit me, “ahh, now I know why he built that space in the shape it was – smacked in the centre of our artsy home. He wanted everyone to see our art.

I remember when I was about 7 years old when we took off the kitchen cupboard doors. We had very little, if any, money. The cupboards remained without doors for years. Our family has been unwilling to sell them, even though the offers for these impromptu paintings on cupboard doors still have the hinges mounted or hanging off them. One time, we didn’t even have paint. So we rigged up a medium and surface to hold that medium. The painting is a bit of plaster, a dash of purple house paint and all kinds of different spices and sugars for colour and texture. As a family, we did what we had to do. Even when it felt like the world was closing in on us, we found some way to keep creating. I spent hours upon hours searching for the right rock or tree bark to paint or use in a construction. From a young age, I learned that the proper frame, stretcher, surface, or background could be found for any art creation.

After about 2 years off of creating full-time due to education and teaching pursuits, I had to get back at it. I just had to. I considered a few options but I needed to build. I needed to get my hands dusty and covered with filler and paint. As I was going through my artistic idea journal, I was drawn back to drums and exterior wood and paper sign board. As amazing as it sounds, as soon as I found my place in my art-space of mind, commission requests came to greet me and my new drum collection found its voice.

In the following pictures, I have included some snapshots of my frame and stretcher work for these new art pieces. I am having the time my life. So much fun and so fulfilling to prepare the pieces to be painted.

Portia Po Chapman Artist Making Canvas Stretcher Sanding Frame Belleville Ontario Canada
Portia Po Chapman Making a Canvas Stretcher for Her “My Creation” Mural: Sanding Stretcher
Portia Po Chapman Artist Making Canvas Stretcher Filling Holes Belleville Ontario Canada
Portia Po Chapman Making a Canvas Stretcher for Her “My Creation” Mural: Filling Holes
Portia Po Chapman Artist Making Hand Drum Sanding Frame Belleville Ontario Canada
Portia Po Chapman Sanding a White Cedar Drum Frame

Contact

Go back

Your message has been sent

Warning
Warning
Warning
Warning.

Belleville, Ontario, Canada
portia@loveartbypo.ca
613-779-7975