The final sanding stages begin in the woodshop for Day 15.
Levelling the Joint: Precision Sanding in the Winter Workshop
Welcome back to the workshop! Today is all about the “Great Sanding.” The dust is flying as we move into the first and most critical stage of finishing: leveling that joint.
In today’s video, I’m at the drum sander, pink shop apron on, getting to work on the white oak frame. You’ll see me focusing on the seam where the wood overlaps.
“We are sanding the sharp edges off of the seam. We are using a RIDGIDOscillating Edge/Belt Spindle Sander so that the seam is really nice and even. Some of my competitors leave this inside edge. But you won’t find that here at Love Art By Po.”
The “Po” Difference
For me, the inside of the drum is just as important as the outside. By using the drum sander to level those sharp edges, I ensure the frame feels like one continuous, seamless piece of wood. It’s a small detail, but it’s what makes a Love Art By Po drum a professional piece of art.
The Holiday Schedule
We are moving fast to hit our December 27th stringing deadline! Here is what the next few days look like:
Day 16 (Tomorrow, Dec 24): I’ll be finishing the hand-sanding and moving straight into the custom staining process.
Christmas Day (Dec 25): The studio will be closed. I’ll be taking the day to celebrate with family while the first layers of our work cure.
Day 17 (Boxing Day, Dec 26): We hit the ground running with the first coats of varnish in the painting studio.
Come back tomorrow for Day 16 to see these frames finally get their colour!
See You Tomorrow for Day 16
Read more about my art and contact information at Love Art By Po and the many drums I make. To contact me directly, please use this email:
Stepping into the winter workshop for Day 14! The real-time race to New Year’s Eve begins.
From Summer Bends to New Year’s Song: The Real-Time Race to December 27
Welcome to Day 14! The seasons have shifted, and it is officially winter here at the Love Art By Po studio. As I toss this fresh Kingston snow into the air, I am inviting you to step out of the summer archives and follow along with the Drum December real-time videos from inside my workshop, where it is warm.
We have finally moved back into the winter wood shop to finish the frames that we have been working on throughout the first thirteen days of Drum December. Sitting here at my bench, surrounded by some of the cherry, maple white oak frames I crafted in the heat of the summer, the journey ahead feels both exciting and urgent. On New Year’s Eve, I plan to drum a drum made from one of these hardwood dry-bent drum frames.
It is December 22nd, and we are now in real-time. My goal is to transform this raw white oak frame into a finished work of art—much like this sanded, green-stained, and varnished maple frame beside me (featured in the video below).
The clock is ticking toward my December 27th deadline. We must have the frame ready to string by then so the rawhide has the time it needs to dry, allowing us to drum in the New Year together.
Between Christmas celebrations and family gatherings over the next four days, I will be balancing holiday joy with shop discipline. To transform these raw summer hoops into a finished masterpiece, I need to follow these specific steps:
The 8-Step Sprint to Stringing
Level the Joint: Using a drum sander, I’ll sand the joint edges. The goal is to make the overlapped ends appear as one continuous, seamless hoop.
Progressive Sanding: I’ll sand the entire frame using 80, 120, and then 220 grit papers. It is vital to start coarse and transition progressively to the finest grit.
Detail Work: Using a “mouse,” palm sander, or oscillating sander, I will delicately sand every inch until the wood is perfectly smooth and all scratch marks vanish.
The Hand-Finished Touch: I’ll complete the final sanding by hand for total control.PRO-TIP: Do NOT use 400+ grit sandpaper. If the wood is too “polished,” the stain cannot penetrate effectively to reveal the beautiful, natural woodgrain.
Custom Color: I’ll hand-mix a custom stain and apply it to the wood with a cloth to bring out its unique personality.
The First Coat: The frame moves to the painting studio for its first layer of varnish.
Refining the Finish: Once dry, I’ll lightly sand the varnished frame and wipe it down with a tack cloth to ensure it is dust-free.
The Final Glow: I’ll apply the remaining coats. While I hope for two, sometimes it takes three or four to reach the perfect luster.
Why the Frame Matters
I treat my drum frames like a standalone piece of art because I choose not to fully cover the outside edge with the rawhide. I want the wood to highlight and accent the rawhide head, not just support it.
Come back tomorrow for Day 15 for the full drum sanding tutorial. It is truly amazing how rough, unfinished wood can be transformed to look like opaque stained glass.
Clamped wood drum frames from the summer bending sessions, ready to be finished in the winter studio.
Beyond the Clamps: Wrapping the Summer Bend for a Winter Reveal
We have reached Day 13 of Drum December. Using my innovative dry-bend technique and the disciplined 6-clamp method for freehand organic formation, the drum frames are now set. They have been glued and secured into their unique shapes and sizes—now, we must give them the gift of time.
The Art of the Cure
In the heat of the summer, I prefer to hang the clamped frames in the maple tree at the Love Art By Po studio. I’ve found that the blazing summer sun and a hot woodshop can be too aggressive; the glue and wood need to work their magic at their own pace. This stage cannot be rushed.
Whether they are hanging in the cool shade of a tree or resting in my humidity-controlled studio, the environment must be just right. To ensure the wood “remembers” its new shape without stress, I maintain these optimal conditions:
Temperature Range: 18–27°C (65–80°F)
Humidity: 55%
Lighting: Reduced UV exposure with dappled, indirect sunlight
More Than Craft: The Living Drum
Once dry, the frames move into my controlled environment for about 30 days. But this isn’t just storage—it is an introduction. I bring them into a living space filled with family conversation, singing, and music. I introduce them to their “sister drums” by playing the finished drums that surround them.
Some might think of drum making as simple carpentry, like crafting a coffee table, but the wood tells a different story. If you do not acknowledge their living nature, they rebel. For years, I heard stories of drums as family members who “talk” in their own ways. I never truly comprehended how that was possible until I began making them myself. Now, I know the truth: Drum making, most assuredly, becomes LIFE.
The Pivot: Moving to Real-Time
Today is December 21, 2025. Our summer-bent frames have dried, been unclamped, and are fully conditioned to the spirit of my studio. Starting tomorrow, Day 14, we leave the archives behind and move into real-time.
We are officially on a countdown to New Year’s Eve. To drum in 2026 with a newly finished piece, I must have the rawhide strung by December 27. Rawhide requires three days to dry in perfect conditions, and with the shifting winter weather outside my stringing studio, this will be a true nail-biter.
Nature will do as Nature does, and the drum is a part of that natural world. Join me tomorrow for Day 14 as we step into the workshop to begin the sanding and finishing.
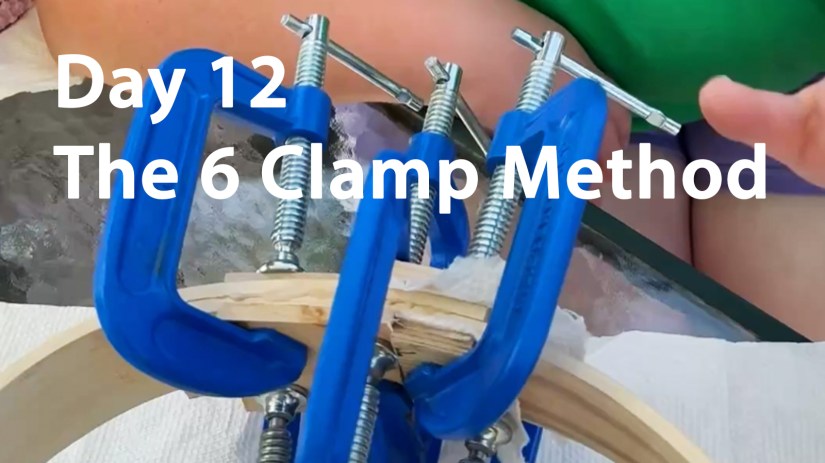
Mastering the “6 Clamp Method” to ensure a secure, even bond on the dry-bent drum frame.
Drum December Day 12: Mastering the 6-Clamp Method
Welcome to Day 12 of Drum December! Today is the day we tackle dry-bending and clamping head-on. In this tutorial, you’ll learn the vital “what-to-dos” (and the painful “what-not-to-dos”) of securing your frame.
Clamping hardwood is a bit like attending your grandmother’s third wedding and being asked to dance by a gentleman who took lessons from Chubby Checker. Just like a dancer from the ’60s, the wood keeps trying to “Twist.” By following my innovative 6-Clamp Method, you’ll have no problem taking the lead in this clamping dance.
The Anatomy of the Dance: Twist and Circularity
When making drum frames, there are two primary style considerations you must face:
The Twist: How much natural “sport” or torsion your finished frame will carry.
The Shape: How perfectly circular or organic you want your finished drum to be.
Both of these decisions are finalized during the clamping stage. This is exactly why I developed the 6-Clamp Method—to give the maker total control over the wood’s final expression.
Avoiding the Tangled Clamp: The Staggering Method
In Day 11, I explained how the shape changes depending on which end overlaps on the outside. Today, we focus on the direction of the clamps.
Because you are using six heavy-duty C-clamps in very close proximity, the handles can easily get stuck against each other. It can be a deeply frustrating process! Below is a video of my own experience trying to turn clamp handles that weren’t staggered. If you find it painful to watch, just imagine being the one trying to turn them under pressure!
To solve this, we stagger the clamps—top and bottom—in a disciplined sequence. This allows us to intricately pull the seam together while “reading” the bend and twist of the frame.
The 6-Clamp Sequence: A Step-by-Step Guide
I have created this incremental schematic to show you the exact order of operations. Note how each clamp is placed to manage the tension of the 3″ to 5″ glued seam:
Clamp #1: Placed on the top, dead-center of the seam.
Clamp #2: Placed directly beneath the first, but facing the opposite direction.
Clamps #3 & #4: Placed on the side of the center clamps closest to the inner board end.
Clamps #5 & #6: Placed on the remaining opposite side.
Shaping with Baffles: Controlling the Curve
In the schematic video above, I omitted the cutoff baffles (the hardwood blocks that protect your frame) for clarity. However, you must use them!
The size of the baffle on the inside of the frame actually alters the drum’s final shape.
The Standard: I typically use a 1″ x 3″ piece of oak.
The Adjustment: If you want to flatten a side or create an egg-shaped drum, you do this by widening the inner baffle. The wider the baffle, the flatter that section of the frame becomes.
The Rule of Thumb: I generally use a 1″ wide piece on the inside and a 2″ wide piece on the outside, adjusting the spacing as I feel the wood react.
The Goldilocks Grip: Just Enough Pressure
By alternating your clamps, you aren’t just preventing a handle jam—you are managing the twist. When the first clamp goes on, you can adjust the shift and slide of the frame. The second clamp adds stability, and clamps three through six do the heavy lifting.
Tighten them as firmly as your hand can turn—no need for tools. You are looking for the glue to “squeeze out” evenly along the seam. Be careful not to over-tighten! If you squeeze out too much glue, you’ll create a “starved” joint. This results in a fragile frame that may snap when the powerful tension of the rawhide eventually pulls it into its final form.
Looking Ahead
If you think a tree has a long memory, just wait until you see the nature of rawhide. Keep following the Drum December series to see how we work with animal skins in the coming days.
Even if you never pick up a clamp yourself, I hope you’ve learned how to straighten out “The Twist.” Just start in the middle of the floor and lead your partner—side-stepping and swaying until the song is done and you both become one with the true drumbeat of life.
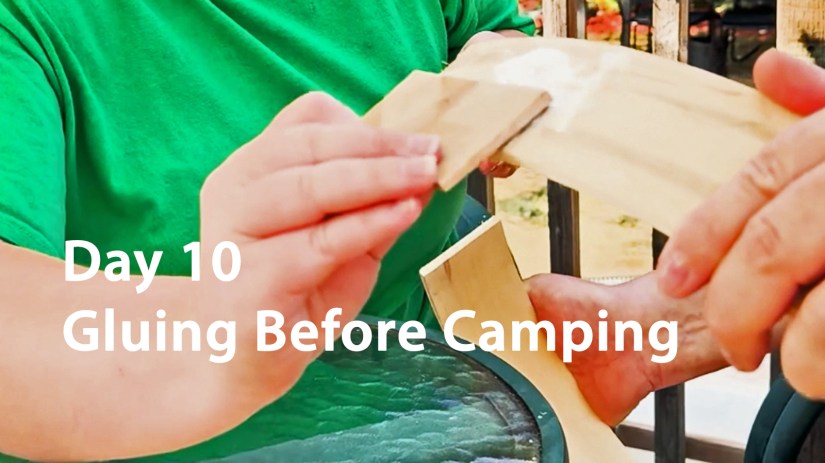
Drum December Day 10 – Po Glues the White Drum Frame Before Clamping the Dry-Bend
Choosing the Right Glue for Handcrafted Drum Frames | Drum December Day 10
At the Love Art by Po studio in Kingston, I believe that building a professional-grade drum frame is as much about the type of glue as it is the technique used to apply it.
Different moisture levels in wood require different chemical bonds. Whether you are working with freshly steamed “green” wood or seasoned dry wood, choosing the wrong adhesive can compromise the sound of your instrument. In today’s update, I’ll explain how to pick the right glue at your local hardware store to ensure a lifetime of pure sound.
The Challenge: Gluing Damp vs. Dry Wood
The first hurdle every drum maker faces is moisture. If you are bending steamed red oak, the wood is naturally damp.
Early in my practice as an installation artist, I treated drum frames like standard carpentry—LePage Pro Carpenter’s Glue. However, standard wood glue and damp, steamed wood do not mix. I would return to my shop table the next morning to find the joint “slimy” and uncured on the inside.
The Polyurethane Solution
To glue damp wood effectively, you need a moisture-activated adhesive like Original Gorilla Glue. This polyurethane glue uses the moisture in the wood to “activate” the bond. It bonds damp frames like a dream, but it comes with a significant trade-off: The Foam.
The Science of Sound: Why “Foaming” Glue Causes Rattle
If you want a pure, resonance-free tone, you must understand how glue affects vibration. Polyurethane glue expands into a foam, creating tiny air pockets within the joint.
Are Drum Frames Meant to Rattle?
The Rattle: If you enjoy a “smooth rattle” or mechanical reverberation, foaming glue is your best friend.
The Pure Tone: If you want a clean strike, never use foaming glue. The drum frame produces sound just as much as the rawhide. If your glue joint contains air pockets, the vibration of the drum strike can cause a “seam rattle” deep within the wood.
How to avoid the rattle:
Glue the frame only when the wood is fully dry.
Use a non-foaming moisture-resistant glue like Gorilla Glue Clear. (Note: “Non-foaming” glues can be slippery, making clamping a damp frame more difficult.)
Three Steps to a Rattle-Free Steamed Frame
If you are new to drum making, remember that hitting a drum with “enthusiastic force” will eventually shake loose any weak or brittle bonds. To ensure your steamed frame remains silent and solid, follow these three steps:
Cooling Time: Let the wood cool until it is no longer steaming, but is still slightly damp before applying glue.
Even Spread: Use a non-foaming polyurethane glue spread evenly across the entire joint.
Pressure: Use 6+ C-clamps, applied two at a time on opposite sides to ensure even compression.
Innovating with Dry Wood Bending
For my premium drums, I prefer to glue the wood when it is fully dry. This produces a beautiful, rattle-free instrument. However, dry hardwood doesn’t like to bend—it behaves like a floor plank!
To solve this, I developed a proprietary dry-bending technique. The wood is pre-bent and shaped before the glue is ever applied. You can see the foundation of this technique in my previous posts: Day 5, Day 7, and Day 8.
Why? It offers a longer working time, becomes “tacky” quickly for better clamping, and is rated for both interior and exterior use.
The Secret: Let the wood and glue “perform their magic” for at least 24 hours before sanding or knocking the frame.
The “Drum Making Golden Rule”
Frame drums are built for life—they go from drizzling rain at a community circle to the dry heat of a bonfire. Because they are exposed to moisture, heat, and travel, your glue must be waterproof.
The Golden Rule:
No matter the purpose of the drum, ALWAYS use a high-strength, waterproof glue that produces zero (or nearly zero) bubbles.
Coming Tomorrow: Join me for Drum December Day 11, where I’ll share a deep-dive tutorial on Professional Clamping. I’ll show you the “tricks of the trade” to ensure your frame is perfectly circular and structurally sound.
[…] Welcome back to Drum December! Today, we are diving into one of the most transformative stages of the process: using my innovative dry-bending technique to compress and clamp the drum frame. This method is born from my preference for non-polyurethane glues, which we explored in our Day 10 tutorial. […]
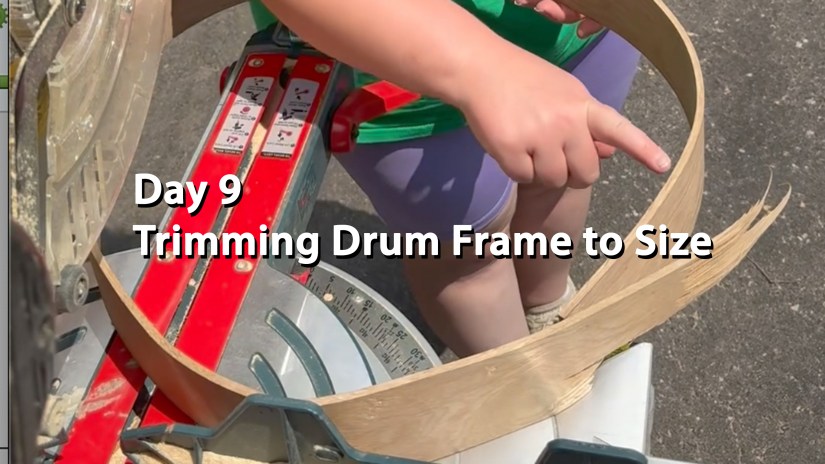
Po trims the white oak to the desired drum frame size at her Kingston Art Studio
Kingston Artist, Portia “Po” Chapman trims the white oak drum frame to size at her studio.
On day 8, my trusty assistant compressed the dry bent oak to the size that I wanted for the finished drum to become. As he held it in place, I marked the board with a pencil. Day 9, also marks the mid stage of drum frame creation.
Once we cut off the white oak at yesterday’s pencil markings, we will see the drum frame coming into its drum shape for the first time. I have a smaller trim miter saw, but I prefer using my 12″ chop saw with a trimming tooth blade installed. The larger blade alleviates the fiddliness of cutting the large hoop with a small blade.
Oh, and this trim will remove the breakage that we found on day 6. Phew!
Come back tomorrow, Day 10, when we move on to our next stage of drum frame creation: gluing and dry-bending. The next couple days are going to be exciting; we are on the homeward stretch now.
Come back tomorrow for Day 10 – when we apply the glue. There are 4 types of glue that we can use, I will explain the options on Day 10.
New to the blog? Read more about Po and her art here.
On Day 8 of Drum December, Po’s assistant compresses the bent oak while Po marks the board where she will cut it on Day 9.
Thank you for watching along as we engage on this drum making adventure. This is the first time that I have made a white oak drum frame and as you can see, it has been an adventure.
On Day 8 of Drum December, my assistant and I prepare the steam-bent white oak which is to be cut off in order to create my preferred drum diameter. The reason I mark the wood this way is because the best sounding drums have the least glue. So by marking it with both ends overlapping, I can judge how large the completed joint will become. I aim for a 2″ drum frame joint when the drum is complete.
For more information about Love Art by Po drumssee here.
The Art of Compression Without Snapping the Frame
The process of compression without snapping the frame is exceptionally nuanced and requires much attention. This is the reason why I prefer dry-bending the final bend. The stunning personality of every piece of milled and bent timbre is felt as the compression reaches its limit. I have tried mechanical bending methods but those methods remove the connection with the fibres, and this process needs to be gentle and understanding.
Hugging Drums is Like Hugging Trees
Just because a tree is cut down and made into lumber, it never stops being a tree. I grew up listening to trees. For 18 years of my life, they sheltered me, comforted me, and taught me ancient lessons of beauty and strength. I met my ancestors as they stooped down, inviting me to sing as their branches drummed a beat for me to follow. In my second year of my BFA, the apple tree, that I used to climb as a child, died and began falling to the ground. In a way, I felt to blame for its loss of health.
You see, I left it in the field when I went away to University. So for my first large sculpture installation, I gave it back its voice by sculpting it back to its life giving form – even with birds nests and robin eggs. I could once agin hear it whisper. In the spring, when I returned to the field, the apple tree, at the very top, was growing leaves reaching to the sky. Today, as I make frame drums, it is my way of giving back to the trees – to hear their voices sing again. For me, I feel blessed to be a drum maker. It is a calling. It is LIFE! When shaping drum frames, I hug them just like I hug trees still able to stand. Every drum frame is realized out of love and respect. To read more about Indigenous relationships with trees, follow this link. But please come back.
Gentleness Guided the Bend
For the compression, you will notice in the video, my assistant has rested the white oak on his lap. By doing so, he makes full contact with both sides of the new drum frame shape. He can feel the oak tighten and relax. He makes it look so easy after many years of woodworking, but this critical step truly requires inner stillness. After all, I learned to hug trees because of him. As he bends it, he can hear the oak say when it has coiled enough. Just as it reaches its chosen limit, I can sense it too.
This white oak, has required understanding more than the other hardwoods. But, when it reached its bend limit, instead of screaming out, it gave a relaxed sigh of relief, like it said: “Finally back home.”
Marking the Board
Due to the length of the video, it is unclear where I marked the piece. In this case, I marked it in two locations. Often, I do one continuous mark across both edges. Again, this is not a science. I wish that I could give a clear instruction, but it really is again about… Knowing the right spot(s).
When I set out to write this post about this seemingly simple bend and mark, it was not my intention to share the spiritual, soulful relationship of bending drum frames. I guess, the ancestors thought that it was a good time to remind us that drum frames and drums are just as much part of this life as they were as trees. Please know that when you buy (adopt) one of the drums that I make, your drum has been nurtured into existence with care.
Come back tomorrow for Day 9 – the painful moment of cutting the frame to size.
[…] To solve this, I developed a proprietary dry-bending technique. The wood is pre-bent and shaped before the glue is ever applied. You can see the foundation of this technique in my previous posts: Day 5, Day 7, and Day 8. […]
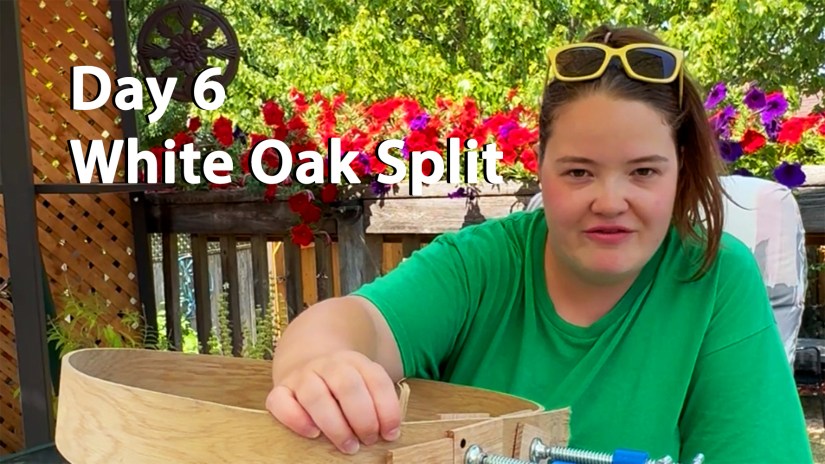
Day 6: A small white oak split appears after the first bend — an expected part of pushing hardwood to its limits.
Today marks the moment of truth for the first bend of the white oak drum frame. After spending the night under clamps, the wood finally revealed how it responded to yesterday’s bending session — and as always, the material had a story to tell.
If you’re new here and want to learn more about who I am and the work I do, you can visit my About & Contact page.
When I brought the frame into the studio this morning, the very first thing I did was check the inside curve. And there it was: a small split along the tightest part of the bend.
For many people, that might feel alarming. But for me, this isn’t unusual at all — especially with a dense hardwood like white oak. Pushing any wood to the minimum bend radius it can tolerate means you’re working right at the threshold where the fibres must stretch, compress, and adapt. Sometimes, a small split appears as part of that process.
What a Split Really Means in Drum Making
A split doesn’t automatically mean failure.
It’s a diagnostic clue.
It tells me:
how far the wood was willing to travel,
how much internal tension remains in the frame,
and whether the second bend — the glued dry-bend — will seat properly.
In this case, the split is shallow and controlled. That tells me the clamps did exactly what they were supposed to do: prevent the fibres from opening too far while still allowing the bend to hold.
This is why clamp placement is a true art form in drum making. You don’t just tighten clamps to tighten clamps. You tighten them in anticipation of how the wood is likely to react.
If you’d like to explore my handmade drums, see past builds, or learn about upcoming workshops, visit my Drum Page here.
White oak is expressive — and today, it expressed itself in a way that still sets us up for a strong final frame. As well, the location of the minor breakage will be cut off before gluing the final bend. I don’t sweat these things now, but when I first started bending drum frames, I was totally panicked when the first breakage happened. It was a learning experience – that is for sure!
Reading Tension, Relaxation, and “Feel”
Every wood species responds differently during the first bend. White oak? Well…It hums with a very particular kind of density.
When I picked up the bent frame today, I could feel subtle tension still living inside the curve. That’s not unexpected — in fact, with white oak, it’s quite normal. White oak, unlike red oak, doesn’t particularly like being bent.
The key for Day 6 is simply evaluating:
Did the bend hold its overall shape?
Is the curve even?
Is the split stable and non-progressive?
Does the wood want to spring open dramatically or gently?
All signs today point to a solid first bend. It was a success. PHEW!!!
Come back tomorrow, Day 7, to watch and read about the what happened when I released the clamps.
The next step — which comes tomorrow — is the careful release of the clamps. That’s where I discover how much reflex the wood has stored and whether it settles into the intended diameter or pushes back aggressively.
For now, the job is simply to observe, interpret, and prepare.
White oak may be challenging, but today’s results show that this drum frame is very much on track.
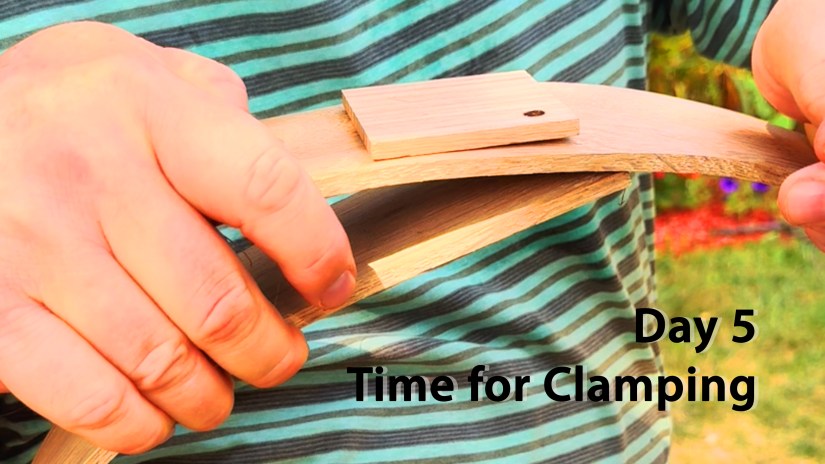
Po prepares the sun-steamed red oak board for its first clamp — the moment the drum’s circular form begins.
Today marks a major turning point in Po’s sun-steamed red oak experiment — the moment when softened hardwood, warm from the solar tubes, is guided into its first held shape. After days of heating, coaxing, and patiently encouraging the wood fibres to relax, it’s finally time for the clamp.
Freehand bending is never a one-person job. With red oak especially — two sets of hands are essential. One pair holds the ends together, and the other manages the clamps with steady confidence.
As the camera rolls, Po’s assistant lifts one end of the oak over the other. You can see immediately that the top end doesn’t lie flat; instead, it sticks out stubbornly, like a child refusing bedtime. This is normal. In every bend, no matter the length, one end refuses to behave. The wood always tries to return to straightness — its original memory.
To protect the tender, freshly steamed wood, Po uses two small oak offcuts as buffers. The cut-offs keep the clamp from denting the softened wood, which is especially vulnerable before it dries.
The First Clamp: Where Courage Meets Making
Po tightens the lower piece first, then holds the top piece and slowly turns the clamp. With each rotation, the ends of the red oak pull closer together. This is the first of two clamping stages in Po’s innovative dry-bending technique — a method she has refined through experimentation, intuition, and respect for the material.
This first loop must dry with the clamps on for about two days. Only then will the wood be ready to release, be cut to size, glued, and clamped again into its final drum frame shape.
What the video doesn’t show is just how lively the wood can be. Even at this stage, red oak is strong and springy. If it suddenly opens, the clamp can fly across the room — a heavy steel reminder that wood is a living material. Some drum makers use ratcheting straps to control this, but Po avoids this method. The hooks and pressure points don’t sit flush, and can scar the damp wood just before it snaps back.
Instead, Po trusts the method shown here — a method that gives her control, precision, and the markings she demands from her handcrafted drum frames.
Freehand bending sun-steamed wood may look simple, but it takes courage, strength, intuition, and sometimes… a little prayer.
And today, with hands steady and clamps in place, Po brings her drum loop one step closer to becoming the finished frame that will hold the heartbeat of future songs.
Check back for Day 6 to see how the bend holds — and what surprises the wood reveals next.
[…] comes time for the final clamp. If you missed the early stages of this journey, you can catch up on Day 5 and Drum December Begins to see how we prepare the wood to be […]
Po and her assistant share a moment of nervous laughter.
Today, Po takes the next brave step in her sun-steaming white oak experiment — the moment when softened hardwood meets human hands for its very first bend. And this time, the studio was full of laughter, nerves, and a little bit of chaos.
Preparing for the First Bend
After three days of solar steaming and fibre relaxation, the white oak was finally ready to move toward its circular drum shape. But white oak is known for being stubborn — unlike red oak or cherry, which tend to cooperate more easily. This was Po’s very first time attempting to bend white oak, and the air carried that charged mix of excitement and hesitation.
Because the frame pieces were long, Po called in an assistant during this stage. Today, she chose DAD.
Before the camera was rolling, Po looked at her assistant with a theatrical seriousness and joked:
“If it breaks, you can be the one to blame! I don’t want to be the one who snaps it.”
That set the tone. The wood was ready. We… were getting there.
The Moment Before the Bend
As her assistant stood there, holding one end of the hot, hopefully flexible, board trying to work up the courage for the first bend, Po stepped beside her trusty assistant to offer support — and then they immediately broke into laughter. She tucked herself halfway behind his arm, peeking out like someone about to watch a suspenseful scene in a movie.
The cameraperson had already begun losing patience with how long it was taking and insisted that they stop laughing and get serious. She wanted to get the shot. Then she started laughing.
This is the real life of drum frame bending at Po’s Kingston Art Studio — part process, part comedy, all family, ALL ART. Drum making is a beautiful, love-filled-art, and this short video illustrates the joy that cheers out with exuberance of Love Art By Po.
Nervous Laughter, Real Art
In today’s short video, you can witness the exact moment when nervous laughter gives way to determination. Po, her assistant and cameraperson take their positions, breathe through the tension, and finally begin the first coaxing bend of the white oak.
It’s only a small curve — a gentle start — but it marks the beginning of the transformation, from plank to drum. And as simple as it looks, this step matters: the first bend dictates how the wood will behave when the full circular frame is shaped and clamped.
A Family Moment in the Making of a Drum
What the video doesn’t capture — but what filled the studio — is the feeling of teamwork. Making drums in this space has always been infused with love, humour, and family togetherness. Today was no exception.
Drum-making is not simply about shaping wood at Love Art By Po; it’s about beautiful, shaping moments — that make everyone stronger.
Making drums has taught Po an incredible life lesson – a circle of wood is like a circle of loved-ones, when you push on them – they get stronger as they find their harmonious tune.
Join us again for Day 5, where Po continues shaping the wood — and the shared moments — that make every drum a circle of strength and love.


Let Me Know What You Think! Start or Join the Convesation