The final sanding stages begin in the woodshop for Day 15.
Levelling the Joint: Precision Sanding in the Winter Workshop
Welcome back to the workshop! Today is all about the “Great Sanding.” The dust is flying as we move into the first and most critical stage of finishing: leveling that joint.
In today’s video, I’m at the drum sander, pink shop apron on, getting to work on the white oak frame. You’ll see me focusing on the seam where the wood overlaps.
“We are sanding the sharp edges off of the seam. We are using a RIDGIDOscillating Edge/Belt Spindle Sander so that the seam is really nice and even. Some of my competitors leave this inside edge. But you won’t find that here at Love Art By Po.”
The “Po” Difference
For me, the inside of the drum is just as important as the outside. By using the drum sander to level those sharp edges, I ensure the frame feels like one continuous, seamless piece of wood. It’s a small detail, but it’s what makes a Love Art By Po drum a professional piece of art.
The Holiday Schedule
We are moving fast to hit our December 27th stringing deadline! Here is what the next few days look like:
Day 16 (Tomorrow, Dec 24): I’ll be finishing the hand-sanding and moving straight into the custom staining process.
Christmas Day (Dec 25): The studio will be closed. I’ll be taking the day to celebrate with family while the first layers of our work cure.
Day 17 (Boxing Day, Dec 26): We hit the ground running with the first coats of varnish in the painting studio.
Come back tomorrow for Day 16 to see these frames finally get their colour!
See You Tomorrow for Day 16
Read more about my art and contact information at Love Art By Po and the many drums I make. To contact me directly, please use this email:
Stepping into the winter workshop for Day 14! The real-time race to New Year’s Eve begins.
From Summer Bends to New Year’s Song: The Real-Time Race to December 27
Welcome to Day 14! The seasons have shifted, and it is officially winter here at the Love Art By Po studio. As I toss this fresh Kingston snow into the air, I am inviting you to step out of the summer archives and follow along with the Drum December real-time videos from inside my workshop, where it is warm.
We have finally moved back into the winter wood shop to finish the frames that we have been working on throughout the first thirteen days of Drum December. Sitting here at my bench, surrounded by some of the cherry, maple white oak frames I crafted in the heat of the summer, the journey ahead feels both exciting and urgent. On New Year’s Eve, I plan to drum a drum made from one of these hardwood dry-bent drum frames.
It is December 22nd, and we are now in real-time. My goal is to transform this raw white oak frame into a finished work of art—much like this sanded, green-stained, and varnished maple frame beside me (featured in the video below).
The clock is ticking toward my December 27th deadline. We must have the frame ready to string by then so the rawhide has the time it needs to dry, allowing us to drum in the New Year together.
Between Christmas celebrations and family gatherings over the next four days, I will be balancing holiday joy with shop discipline. To transform these raw summer hoops into a finished masterpiece, I need to follow these specific steps:
The 8-Step Sprint to Stringing
Level the Joint: Using a drum sander, I’ll sand the joint edges. The goal is to make the overlapped ends appear as one continuous, seamless hoop.
Progressive Sanding: I’ll sand the entire frame using 80, 120, and then 220 grit papers. It is vital to start coarse and transition progressively to the finest grit.
Detail Work: Using a “mouse,” palm sander, or oscillating sander, I will delicately sand every inch until the wood is perfectly smooth and all scratch marks vanish.
The Hand-Finished Touch: I’ll complete the final sanding by hand for total control.PRO-TIP: Do NOT use 400+ grit sandpaper. If the wood is too “polished,” the stain cannot penetrate effectively to reveal the beautiful, natural woodgrain.
Custom Color: I’ll hand-mix a custom stain and apply it to the wood with a cloth to bring out its unique personality.
The First Coat: The frame moves to the painting studio for its first layer of varnish.
Refining the Finish: Once dry, I’ll lightly sand the varnished frame and wipe it down with a tack cloth to ensure it is dust-free.
The Final Glow: I’ll apply the remaining coats. While I hope for two, sometimes it takes three or four to reach the perfect luster.
Why the Frame Matters
I treat my drum frames like a standalone piece of art because I choose not to fully cover the outside edge with the rawhide. I want the wood to highlight and accent the rawhide head, not just support it.
Come back tomorrow for Day 15 for the full drum sanding tutorial. It is truly amazing how rough, unfinished wood can be transformed to look like opaque stained glass.
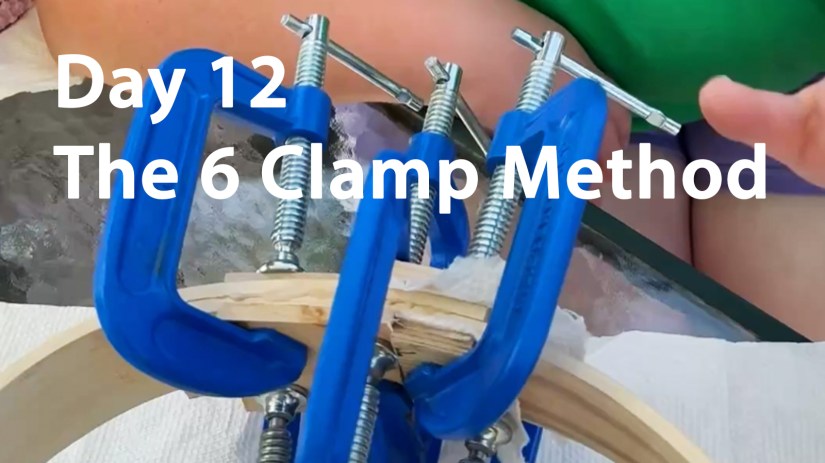
Mastering the “6 Clamp Method” to ensure a secure, even bond on the dry-bent drum frame.
Drum December Day 12: Mastering the 6-Clamp Method
Welcome to Day 12 of Drum December! Today is the day we tackle dry-bending and clamping head-on. In this tutorial, you’ll learn the vital “what-to-dos” (and the painful “what-not-to-dos”) of securing your frame.
Clamping hardwood is a bit like attending your grandmother’s third wedding and being asked to dance by a gentleman who took lessons from Chubby Checker. Just like a dancer from the ’60s, the wood keeps trying to “Twist.” By following my innovative 6-Clamp Method, you’ll have no problem taking the lead in this clamping dance.
The Anatomy of the Dance: Twist and Circularity
When making drum frames, there are two primary style considerations you must face:
The Twist: How much natural “sport” or torsion your finished frame will carry.
The Shape: How perfectly circular or organic you want your finished drum to be.
Both of these decisions are finalized during the clamping stage. This is exactly why I developed the 6-Clamp Method—to give the maker total control over the wood’s final expression.
Avoiding the Tangled Clamp: The Staggering Method
In Day 11, I explained how the shape changes depending on which end overlaps on the outside. Today, we focus on the direction of the clamps.
Because you are using six heavy-duty C-clamps in very close proximity, the handles can easily get stuck against each other. It can be a deeply frustrating process! Below is a video of my own experience trying to turn clamp handles that weren’t staggered. If you find it painful to watch, just imagine being the one trying to turn them under pressure!
To solve this, we stagger the clamps—top and bottom—in a disciplined sequence. This allows us to intricately pull the seam together while “reading” the bend and twist of the frame.
The 6-Clamp Sequence: A Step-by-Step Guide
I have created this incremental schematic to show you the exact order of operations. Note how each clamp is placed to manage the tension of the 3″ to 5″ glued seam:
Clamp #1: Placed on the top, dead-center of the seam.
Clamp #2: Placed directly beneath the first, but facing the opposite direction.
Clamps #3 & #4: Placed on the side of the center clamps closest to the inner board end.
Clamps #5 & #6: Placed on the remaining opposite side.
Shaping with Baffles: Controlling the Curve
In the schematic video above, I omitted the cutoff baffles (the hardwood blocks that protect your frame) for clarity. However, you must use them!
The size of the baffle on the inside of the frame actually alters the drum’s final shape.
The Standard: I typically use a 1″ x 3″ piece of oak.
The Adjustment: If you want to flatten a side or create an egg-shaped drum, you do this by widening the inner baffle. The wider the baffle, the flatter that section of the frame becomes.
The Rule of Thumb: I generally use a 1″ wide piece on the inside and a 2″ wide piece on the outside, adjusting the spacing as I feel the wood react.
The Goldilocks Grip: Just Enough Pressure
By alternating your clamps, you aren’t just preventing a handle jam—you are managing the twist. When the first clamp goes on, you can adjust the shift and slide of the frame. The second clamp adds stability, and clamps three through six do the heavy lifting.
Tighten them as firmly as your hand can turn—no need for tools. You are looking for the glue to “squeeze out” evenly along the seam. Be careful not to over-tighten! If you squeeze out too much glue, you’ll create a “starved” joint. This results in a fragile frame that may snap when the powerful tension of the rawhide eventually pulls it into its final form.
Looking Ahead
If you think a tree has a long memory, just wait until you see the nature of rawhide. Keep following the Drum December series to see how we work with animal skins in the coming days.
Even if you never pick up a clamp yourself, I hope you’ve learned how to straighten out “The Twist.” Just start in the middle of the floor and lead your partner—side-stepping and swaying until the song is done and you both become one with the true drumbeat of life.


Let Me Know What You Think! Start or Join the Convesation