Behind the Art, Behind the scenes, Drum December, Drum Works, How Po Makes Hand Drums, Indigenous Art, Kingston Artist, Po's Drum Making Process, Portia Chapman, Real-Time Crafting, Studio Process, Uncategorized

Drum December Day 19 – Preparing to Stretch the Deer Rawhide

A close-up of Kingston artist Portia Po Chapmanโ€™s hands pressing down on a brown towel that is covering soaked rawhide to remove excess moisture. Bold white text in the center reads "Day 19 Preparing to Stretch Rawhide."
Removing the excess: Preparing the soaked deer rawhide for stringing and stretching on Day 20 of Drum December.

The Art of the Template

Preparation is the silent partner of success. Before we lift the rawhide from its sacred soak, we must ensure every measurement is exact. Thin rawhide, like the deer skin we are using for our White Oak frame, can dry out remarkably fast. If the hide becomes too dry during the stringing process, you risk the sinew ripping right through the skinโ€”a setback we avoid by being “safe rather than sorry.”

Engineering the Perfect Fit

To protect the hide and ensure the beautiful wood of the frame remains visible, I begin by creating a precise template.

The Measurement: I cut a paper guide measuring roughly 1.5″ in length. This ensures the rawhide wraps perfectly, leaving about 0.75″ of space between the stringing holes and the edge.

Digital Precision: After sketching the rough pattern, I move into the digital space. I photograph the pattern and use Photoshop to precisely space the stringing holes.

The Cut: Using my Cricut Maker, I turn that digital file into a physical pattern. This machine truly makes light work of creating an accurate, repeatable guide.

Retrieving and “Swaddling” the Hide

Lifting the rawhide from its bath is a delicate, two-person job. As I hold up a fresh towel, my assistant carefully removes the quartz and geode anchors.

The hide is gently pulled from the water and placed into the towel. The process of wiping it dry feels remarkably like drying a baby after a bathโ€”it requires a gentle, caring touch to move the moisture away while keeping the hide supple.

Once “swaddled,” I move it to a festive workspace and lay it upon a fresh, dry towel to keep it from slipping.

Tracing and Punching: The Final Prep

With the template held firmly against the damp rawhide, I trace the perimeter and every single stringing hole with a pencil.

Steady Hands: It is vital that the template does not shift during this process; a slip here could be disastrous for the drum’s final tension.

The Cut: I move gently but swiftly with tin-snip scissors, following the traced line to trim the hide to its final shape.

The Holes: Using a leather hole puncher set to a medium size (approximately 2.5 mm), I punch out the marks for the sinew.

Real-Time Update: On Schedule for the New Year

As of 10:00 PM on December 27, 2025, I am thrilled to report that we are officially on schedule! To have this drum ready for New Yearโ€™s Eve, it had to be strung by midnight on the 27th to allow for a full three days of drying in a 50% humidity-controlled environment. We hit the deadline! The heartbeat of the New Year is officially within our reach.

Join us tomorrow for Drum December Day 20, where we move into the powerful work of stretching and stringing. The drum is almost ready to find its voice.

Read more about my art and contact information at Love Art By Po and the many drums I make.


To contact me directly, please use this email:

๐Ÿ“ง Portia@loveartbypo.ca

Let Me Know What You Think! Start or Join the Convesation

Behind the Art, Behind the scenes, Drum December, Drum Works, How Po Makes Hand Drums, Kingston Artist, Po's Drum Making Process, Portia Chapman, Uncategorized

Drum December Day 9 | Trimming the Drum Frame to Size

Kingston Artist Po pointing to the trim line. The white oak steam-bent drum frame sits on the chop saw awaiting the first trim.
Po trims the white oak to the desired drum frame size at her Kingston Art Studio

Kingston Artist, Portia “Po” Chapman trims the white oak drum frame to size at her studio.

On day 8, my trusty assistant compressed the dry bent oak to the size that I wanted for the finished drum to become. As he held it in place, I marked the board with a pencil. Day 9, also marks the mid stage of drum frame creation.

Once we cut off the white oak at yesterday’s pencil markings, we will see the drum frame coming into its drum shape for the first time. I have a smaller trim miter saw, but I prefer using my 12″ chop saw with a trimming tooth blade installed. The larger blade alleviates the fiddliness of cutting the large hoop with a small blade.


Oh, and this trim will remove the breakage that we found on day 6. Phew!

Come back tomorrow, Day 10, when we move on to our next stage of drum frame creation: gluing and dry-bending. The next couple days are going to be exciting; we are on the homeward stretch now.

Come back tomorrow for Day 10 – when we apply the glue. There are 4 types of glue that we can use, I will explain the options on Day 10.

New to the blog? Read more about Po and her art here.

See you tomorrow!

๐Ÿ“ง Portia@loveartbypo.ca

One response to “Drum December Day 9 | Trimming the Drum Frame to Size”

  1. Drum December Day 11 – How to Clamp a Drum Frame – Love Art by Po Avatar

    […] trimming the frame on Day 9, you are left with a piece of wood that has a massive 16-inch gap between the ends. It looks like a […]

Let Me Know What You Think! Start or Join the Convesation


Google Maps:
๐Ÿ‘‰ https://maps.app.goo.gl/w1x4JtnsLw39GbHd7

Behind the Art, Behind the scenes, Drum December, Drum Works, How Po Makes Hand Drums, Kingston Artist, Po's Drum Making Process, Portia Chapman, Uncategorized

Drum December Day 8 – Compressing and Marking the Drum Frame

On Day 8 of Drum December, at the Love Art By Po Kingston Art Studio, Po's assistant compresses the bent oak drum frame while Po marks the board where she will cut it on Day 9.
On Day 8 of Drum December, Po’s assistant compresses the bent oak while Po marks the board where she will cut it on Day 9.

Thank you for watching along as we engage on this drum making adventure. This is the first time that I have made a white oak drum frame and as you can see, it has been an adventure.

On Day 8 of Drum December, my assistant and I prepare the steam-bent white oak which is to be cut off in order to create my preferred drum diameter. The reason I mark the wood this way is because the best sounding drums have the least glue. So by marking it with both ends overlapping, I can judge how large the completed joint will become. I aim for a 2″ drum frame joint when the drum is complete.

For more information about Love Art by Po drums see here.

The Art of Compression Without Snapping the Frame

The process of compression without snapping the frame is exceptionally nuanced and requires much attention. This is the reason why I prefer dry-bending the final bend. The stunning personality of every piece of milled and bent timbre is felt as the compression reaches its limit. I have tried mechanical bending methods but those methods remove the connection with the fibres, and this process needs to be gentle and understanding.

Hugging Drums is Like Hugging Trees

Just because a tree is cut down and made into lumber, it never stops being a tree. I grew up listening to trees. For 18 years of my life, they sheltered me, comforted me, and taught me ancient lessons of beauty and strength. I met my ancestors as they stooped down, inviting me to sing as their branches drummed a beat for me to follow. In my second year of my BFA, the apple tree, that I used to climb as a child, died and began falling to the ground. In a way, I felt to blame for its loss of health.

You see, I left it in the field when I went away to University. So for my first large sculpture installation, I gave it back its voice by sculpting it back to its life giving form – even with birds nests and robin eggs. I could once agin hear it whisper. In the spring, when I returned to the field, the apple tree, at the very top, was growing leaves reaching to the sky. Today, as I make frame drums, it is my way of giving back to the trees – to hear their voices sing again. For me, I feel blessed to be a drum maker. It is a calling. It is LIFE! When shaping drum frames, I hug them just like I hug trees still able to stand. Every drum frame is realized out of love and respect.

To read more about Indigenous relationships with trees, follow this link. But please come back.

Gentleness Guided the Bend

For the compression, you will notice in the video, my assistant has rested the white oak on his lap. By doing so, he makes full contact with both sides of the new drum frame shape. He can feel the oak tighten and relax. He makes it look so easy after many years of woodworking, but this critical step truly requires inner stillness. After all, I learned to hug trees because of him. As he bends it, he can hear the oak say when it has coiled enough. Just as it reaches its chosen limit, I can sense it too.

This white oak, has required understanding more than the other hardwoods. But, when it reached its bend limit, instead of screaming out, it gave a relaxed sigh of relief, like it said: “Finally back home.”

Marking the Board

Due to the length of the video, it is unclear where I marked the piece. In this case, I marked it in two locations. Often, I do one continuous mark across both edges. Again, this is not a science. I wish that I could give a clear instruction, but it really is again about… Knowing the right spot(s).

To read more about my art practise, please click this link:

When I set out to write this post about this seemingly simple bend and mark, it was not my intention to share the spiritual, soulful relationship of bending drum frames. I guess, the ancestors thought that it was a good time to remind us that drum frames and drums are just as much part of this life as they were as trees. Please know that when you buy (adopt) one of the drums that I make, your drum has been nurtured into existence with care.

Come back tomorrow for Day 9 – the painful moment of cutting the frame to size.

See you tomorrow!

๐Ÿ“ง Portia@loveartbypo.ca

2 responses to “Drum December Day 8 – Compressing and Marking the Drum Frame”

  1. Drum December Day 10 | How to Glue Before Clamping Drum Frame – Love Art by Po Avatar

    […] To solve this, I developed a proprietary dry-bending technique. The wood is pre-bent and shaped before the glue is ever applied. You can see the foundation of this technique in my previous posts: Day 5, Day 7, and Day 8. […]

  2. Drum December Day 9 | Trimming the Drum Frame to Size – Love Art by Po Avatar

    […] day 8, my trusty assistant compressed the dry bent oak to the size that I wanted for the finished drum to […]

Let Me Know What You Think! Start or Join the Convesation

Behind the Art, Behind the scenes, Drum December, Drum Works, How Po Makes Hand Drums, Kingston Artist, Po's Drum Making Process, Portia Chapman, Studio Process, Uncategorized

Drum December Day 7 โ€” Releasing the Clamps on the White Oak Frame

Portia โ€œPoโ€ Chapman carefully releasing three blue clamps from a bent white oak drum frame during Day 7 of Drum December. The frame gently opens as Po tests the success of the first bend.
Day 7: Po releases the clamps on the white oak drum frame โ€” the moment of truth in the Drum December bending sequence.

Drum December, Day 7’s update brings you right into one of my favourite moments in the drum-making process โ€” releasing the clamps after a full overnight bend (in this case, it took 48 hours to dry). Thereโ€™s always a little suspense in the air: did the frame hold its curve? Did yesterdayโ€™s small white oak split stay contained? OR… Would I just get slapped in the face?

If youโ€™re new to Drum December, Iโ€™m Portia โ€œPoโ€ Chapman โ€” the artist behind these handmade drum frames. You can learn more about my artwork and workshops on my About & Contact page.

Checking the Strength and Integrity of the First Bend

With slow hands and hopeful curiosity, I began removing the clamps one by one. The wood felt settled and responsive, and despite yesterdayโ€™s unfortunate split, the frame held together beautifully. The bend set cleanly and the character of the wood showed itself the way only white oak could; it was strong and unpredictable.

This is one of the reasons I love teaching you about the process of drum-making. Every piece of wood has its own story; some bend effortlessly, while others challenge you and reveal their limits as you work. Day 7 reminds me that, some days, drum frame making is as much about bravery as it is about skill.

Come back tomorrow when we will compress the white oak to the size of drum that I want and proceed to draw the cut marks for length.

See you tomorrow!

๐Ÿ“ง Portia@loveartbypo.ca

3 responses to “Drum December Day 7 โ€” Releasing the Clamps on the White Oak Frame”

  1. Drum December Day 10 | How to Glue Before Clamping Drum Frame – Love Art by Po Avatar

    […] the glue is ever applied. You can see the foundation of this technique in my previous posts: Day 5, Day 7, and Day […]

  2.  Avatar
    Anonymous

    I love seeing how you work,

    1. Portia "Po" Chapman Avatar

      Thanks. It is quite the process, isn’t it?! I just love it.

Let Me Know What You Think! Start or Join the Convesation

To go to Google Maps / Business Platform

Behind the Art, Behind the scenes, Drum December, Drum Works, How Po Makes Hand Drums, Kingston Artist, Po's Drum Making Process, Portia Chapman, Uncategorized, woodworking

Drum December Day 6 โ€” A Small Split, But a Successful First Bend

A close-up of Portia โ€œPoโ€ Chapman examining a freshly bent white oak drum frame outdoors, pointing to a small split formed during the tight first bend, with bright flowers and summer greenery behind her.
Day 6: A small white oak split appears after the first bend โ€” an expected part of pushing hardwood to its limits.

Today marks the moment of truth for the first bend of the white oak drum frame. After spending the night under clamps, the wood finally revealed how it responded to yesterdayโ€™s bending session โ€” and as always, the material had a story to tell.

If youโ€™re new here and want to learn more about who I am and the work I do, you can visit my About & Contact page.

When I brought the frame into the studio this morning, the very first thing I did was check the inside curve. And there it was:
a small split along the tightest part of the bend.

For many people, that might feel alarming. But for me, this isnโ€™t unusual at all โ€” especially with a dense hardwood like white oak. Pushing any wood to the minimum bend radius it can tolerate means youโ€™re working right at the threshold where the fibres must stretch, compress, and adapt. Sometimes, a small split appears as part of that process.


What a Split Really Means in Drum Making

A split doesnโ€™t automatically mean failure.

Itโ€™s a diagnostic clue.

It tells me:

  • how far the wood was willing to travel,
  • how much internal tension remains in the frame,
  • and whether the second bend โ€” the glued dry-bend โ€” will seat properly.

In this case, the split is shallow and controlled. That tells me the clamps did exactly what they were supposed to do:
prevent the fibres from opening too far while still allowing the bend to hold.

This is why clamp placement is a true art form in drum making. You donโ€™t just tighten clamps to tighten clamps. You tighten them in anticipation of how the wood is likely to react.

If youโ€™d like to explore my handmade drums, see past builds, or learn about upcoming workshops, visit my Drum Page here.

White oak is expressive โ€” and today, it expressed itself in a way that still sets us up for a strong final frame. As well, the location of the minor breakage will be cut off before gluing the final bend. I don’t sweat these things now, but when I first started bending drum frames, I was totally panicked when the first breakage happened. It was a learning experience – that is for sure!


Reading Tension, Relaxation, and โ€œFeelโ€

Every wood species responds differently during the first bend.
White oak? Well…It hums with a very particular kind of density.

When I picked up the bent frame today, I could feel subtle tension still living inside the curve. Thatโ€™s not unexpected โ€” in fact, with white oak, itโ€™s quite normal. White oak, unlike red oak, doesn’t particularly like being bent.

The key for Day 6 is simply evaluating:

  • Did the bend hold its overall shape?
  • Is the curve even?
  • Is the split stable and non-progressive?
  • Does the wood want to spring open dramatically or gently?

All signs today point to a solid first bend. It was a success. PHEW!!!


Come back tomorrow, Day 7, to watch and read about the what happened when I released the clamps.

The next step โ€” which comes tomorrow โ€” is the careful release of the clamps. Thatโ€™s where I discover how much reflex the wood has stored and whether it settles into the intended diameter or pushes back aggressively.

For now, the job is simply to observe, interpret, and prepare.

White oak may be challenging, but todayโ€™s results show that this drum frame is very much on track.

See you tomorrow for Day 7 of Drum December!

โ€” Po

๐Ÿ“ง Portia@loveartbypo.ca

Let Me Know What You Think! Start or Join the Convesation

To go to Google Maps / Business Platform

Portia Chapman

Drum December โ€“ Day 5: Time for Clamping

Close-up of hands holding the softened red oak board after sun-steaming, preparing the ends for clamping during Poโ€™s frame drum-making process on Drum December Day 5.
Po prepares the sun-steamed red oak board for its first clamp โ€” the moment the drumโ€™s circular form begins.

Today marks a major turning point in Poโ€™s sun-steamed red oak experiment โ€” the moment when softened hardwood, warm from the solar tubes, is guided into its first held shape. After days of heating, coaxing, and patiently encouraging the wood fibres to relax, itโ€™s finally time for the clamp.

Freehand bending is never a one-person job. With red oak especially โ€” two sets of hands are essential. One pair holds the ends together, and the other manages the clamps with steady confidence.

As the camera rolls, Poโ€™s assistant lifts one end of the oak over the other. You can see immediately that the top end doesnโ€™t lie flat; instead, it sticks out stubbornly, like a child refusing bedtime. This is normal. In every bend, no matter the length, one end refuses to behave. The wood always tries to return to straightness โ€” its original memory.

To protect the tender, freshly steamed wood, Po uses two small oak offcuts as buffers. The cut-offs keep the clamp from denting the softened wood, which is especially vulnerable before it dries.

The First Clamp: Where Courage Meets Making

Po tightens the lower piece first, then holds the top piece and slowly turns the clamp. With each rotation, the ends of the red oak pull closer together. This is the first of two clamping stages in Poโ€™s innovative dry-bending technique โ€” a method she has refined through experimentation, intuition, and respect for the material.

This first loop must dry with the clamps on for about two days.
Only then will the wood be ready to release, be cut to size, glued, and clamped again into its final drum frame shape.

What the video doesnโ€™t show is just how lively the wood can be. Even at this stage, red oak is strong and springy. If it suddenly opens, the clamp can fly across the room โ€” a heavy steel reminder that wood is a living material. Some drum makers use ratcheting straps to control this, but Po avoids this method. The hooks and pressure points donโ€™t sit flush, and can scar the damp wood just before it snaps back.

Instead, Po trusts the method shown here โ€” a method that gives her control, precision, and the markings she demands from her handcrafted drum frames.

Freehand bending sun-steamed wood may look simple, but it takes courage, strength, intuition, and sometimesโ€ฆ a little prayer.

And today, with hands steady and clamps in place, Po brings her drum loop one step closer to becoming the finished frame that will hold the heartbeat of future songs.


Check back for Day 6 to see how the bend holds โ€” and what surprises the wood reveals next.

๐Ÿ“ง Portia@loveartbypo.ca

2 responses to “Drum December โ€“ Day 5: Time for Clamping”

  1. Drum December Day 11 – How to Clamp a Drum Frame – Love Art by Po Avatar

    […] comes time for the final clamp. If you missed the early stages of this journey, you can catch up on Day 5 and Drum December Begins to see how we prepare the wood to be […]

  2. Drum December Day 10 | How to Glue Before Clamping Drum Frame – Love Art by Po Avatar

    […] before the glue is ever applied. You can see the foundation of this technique in my previous posts: Day 5, Day 7, and Day […]

Let Me Know What You Think! Start or Join the Convesation

Behind the Art, Behind the scenes, Drum December, Drum Works, How Po Makes Hand Drums, Kingston Artist, Portia Chapman

Drum December Day 3: Poโ€™s Bendy Wood Reveal

Po Chapman holds a freshly sun-steamed hardwood plank in her backyard studio, demonstrating how flexible the wood has become during Day 3 of her Drum December drum-making process.
The Bendy Test โ€” Po checks the flexibility of her sun-steamed hardwood before shaping it into a drum frame.

Today, Po reveals the next step in her innovative sun-steaming process โ€” the moment when three days of sunlight, water, and patient preparation finally transform kiln-dried hardwood into a material that is ready to bend.

Testing the Wood After Three Days of Sun-Steaming

Today marks the moment when Po checks the results of the full three-day sun-steaming cycle. In yesterdayโ€™s post, we watched her begin this method by sliding the hardwood into the long ridged tube and filling it with water to let the sun do the work. By this morning, the fibres within the wood had warmed, expanded, and begun to relax. Now it was time to see whether the wood had softened enough to become flexible โ€” or whether it needed more time in the sun.

After pouring out the steaming water, Po slid the hardwood out of the tube and laid it gently on the grass. The board emerges from the tube hot, ridged, and stiff โ€” the opposite of what you might expect from a piece of wood that will soon become a circular drum frame. But this is where Poโ€™s ingenuity comes in.

Still too hot to handle with bare hands, Po begins a technique she discovered through experimentation: walking on the wood. Wearing proper shoes, she carefully steps along the length of the board, back and forth, allowing her weight to massage the fibres into motion. The grass protects the surface from dents and provides the perfect soft foundation for the wood to ease into its new flexibility.

For about five minutes, she continues this rhythmic movement โ€” a sculptorโ€™s touch expressed through her feet rather than her hands. And then comes the test.

With one foot still grounding the board, Po gently lifts the opposite end.

In todayโ€™s video, you can see the moment the wood answers.

It bends โ€” cleanly, smoothly, willingly.

This once rigid hardwood is now supple enough to be shaped into the elegant circular frame of a drum. What seemed impossible only days before becomes possible through Poโ€™s blend of patience, innovation, and the natural power of the sun.

Tomorrow, Po will continue the transformation as she prepares the wood for its first bends toward the circle it is destined to become.

Drum December unfolds one authentic, beautiful step at a time.

Stay tuned for Day 4.

๐Ÿ“ง Portia@loveartbypo.ca

One response to “Drum December Day 3: Poโ€™s Bendy Wood Reveal”

  1. Drum December Day 21: Drumming in the New Year 2026 – Love Art by Po Avatar

    […] how beautiful the Drum December drum turned out. This where we started with Drum December. You can learn exactly how we crafted this instrument by visiting the previous 20 days of the […]

Let Me Know What You Think! Start or Join the Convesation

Behind the scenes, Drum December, Drum Works, Kingston Artist, Po's Drum Making Process, Portia Chapman, Sustainable Craft, woodworking

Drum December Day 2: Poโ€™s Sun-Steaming Method Begins

Po Chapman lying in the sun wearing yellow sunglasses and a green shirt, beginning Day 2 of her sun-steaming drum-making process.
Day 2: Po begins her sun-steaming process for crafting hardwood drum frames.

Welcome to Day 2 of Drum December!

Today, Po begins the very first step in her innovative sun-steaming method โ€” a sustainable process she personally developed to prepare kiln-dried hardwood for her premium drum frames and exposed stretchers.

Sun-steaming is a technique that Po pioneered to reduce the environmental impact of traditional wood steaming. Instead of soaking the kiln-dried wood for two days and then heating it with electricity, Po slides the carefully milled hardwood into a long black tube with ridges along its interior.

The ridges guide the wood as it slides in, producing a distinctive sound โ€” the beginning of the transformation.

Once the hardwood is inside the tube, Po fills it with water and lets the sun do all the work. For three full days, the water naturally heats within the sealed tube, allowing the wood fibres to relax and prepare for bending.

An Energy-Conscious Method for Steaming the Wood:

  • Removes the two-day soaking stage
  • Uses no electricity
  • Reduces water consumption
  • Produces a more responsive bend
  • Creates the smooth, elite-quality curves Poโ€™s drum frames are known for

This is where Poโ€™s craftsmanship begins โ€” with innovation, patience, and the sun itself.

Tomorrow, weโ€™ll continue documenting this process as Drum December unfolds, one beautifully authentic step at a time.

Tomorrow, Po continues the transformation as she assesses the wood to see whether it has relaxed enough to become bendy and ready for shaping.

Stay tuned for Day 3!

๐Ÿ“ง Portia@loveartbypo.ca

Let Me Know What You Think! Start or Join the Convesation

Artist Portia Po Chapman Mural, Portia Chapman, Uncategorized

The Rich History of Hand-Painted Kitchen Murals: From Ancient Hearths to Modern Homes

Contemporary Kitchen Mural

History of Hand-Painted Kitchen Murals

Hand-painted kitchen murals may feel like a recent design trend, but their history stretches back thousands of years. As long as humans have gathered around food and fire, we have decorated the spaces where we cook, eat, and connect. These murals reflect cultural values, artistic innovation, and the evolution of the kitchen itself. (See the original sample kitchen without mural.)

Below is a journey through time exploring how kitchen murals began, how they changed, and why they continue to flourish today.

Ancient Beginnings: Art Around the HearthFrom Cave Paintings to Early Communal Kitchens

Long before contemporary kitchens existed, early humans adorned the walls of communal living spaces with painted symbols and scenes. The spaces where people prepared food were often decorated with images of animals, hunts, and daily life.

These early images did more than beautify spaces, they told stories, marked traditions, and connected communities.

Egyptian and Roman Domestic Art

In ancient Egypt, homes of wealthy families featured painted walls depicting food, agriculture, and abundance. These symbols reflected the householdโ€™s prosperity and honoured deities connected to nourishment.

The Romans pushed wall painting even further. In Pompeii and Herculaneum, frescoes decorated kitchens, pantries, and dining areas with images of fruits, fish, wines, and market scenes.

Medieval and Renaissance Kitchens: Function First, Decoration Later

During the Middle Ages, kitchens were utilitarian, smoky, and often separate from the main living quarters. Decoration was limited due to soot and open flames. Still, some monasteries and noble estates painted devotional symbols near hearths as blessings for safety and abundance.

With the Renaissance came a renewed interest in beauty within the home. Frescoes began appearing in dining halls and hearth rooms, including scenes of feasts, harvests, and nature. These early murals set the precedent for connecting kitchens and dining spaces with artistic expression.

The 17thโ€“19th Centuries: Folk Art and Cultural Identity

As homes became cleaner and better ventilated, painted kitchen walls became more common, especially in rural communities.

European Folk Art Traditions

Regions such as:

  • Bavaria (Germany)
  • Scandinavia
  • Eastern Europe
    became known for bright, hand-painted kitchen motifs: flowers, birds, vines, and symbolic patterns.

These murals were typically done by local artisans or homeowners, making the designs deeply personal. They celebrated family heritage, religious beliefs, and seasonal cycles.

Colonial North America

Early North American settlers brought European traditions with them. Hand-painted stencils, sweeping floral garlands, and pastoral scenes decorated hearth rooms and kitchens. Many of these murals doubled as storytelling tools to record harvests, travels, or family events.

The Early 20th Century: Murals Meet Modern Design

As kitchens became more central to the home as gathering spaces, rather than just practical spaces, kitchen murals experienced a revival.

Arts & Crafts Movement

This movement celebrated craftsmanship and natural motifs. Hand-painted tiles and wall panels featuring fruits, flowers, and farm life became common, particularly in English and American kitchens.

Art Deco & Art Nouveau Eras

Sleek, stylized murals with geometric or botanical themes brought elegance to kitchens, often blending artistic flair with the eraโ€™s growing interest in beautifying the home.

Post-War Boom: Murals as Cheerful Homemaking

The 1950s and 1960s brought bright colors, optimism, and a quickly growing home dรฉcor industry.

Popular Themes Included:

  • Fruit baskets
  • Vineyards
  • Roosters and country motifs
  • Cheerful kitchen scenes
  • Checkerboard patterns
  • Decorative borders

Hand-painted murals and stencilling kits became widely available, allowing everyday people to personalize their kitchens for the first time.

Late 20th Century to Today: Custom Art for Modern Lifestyles

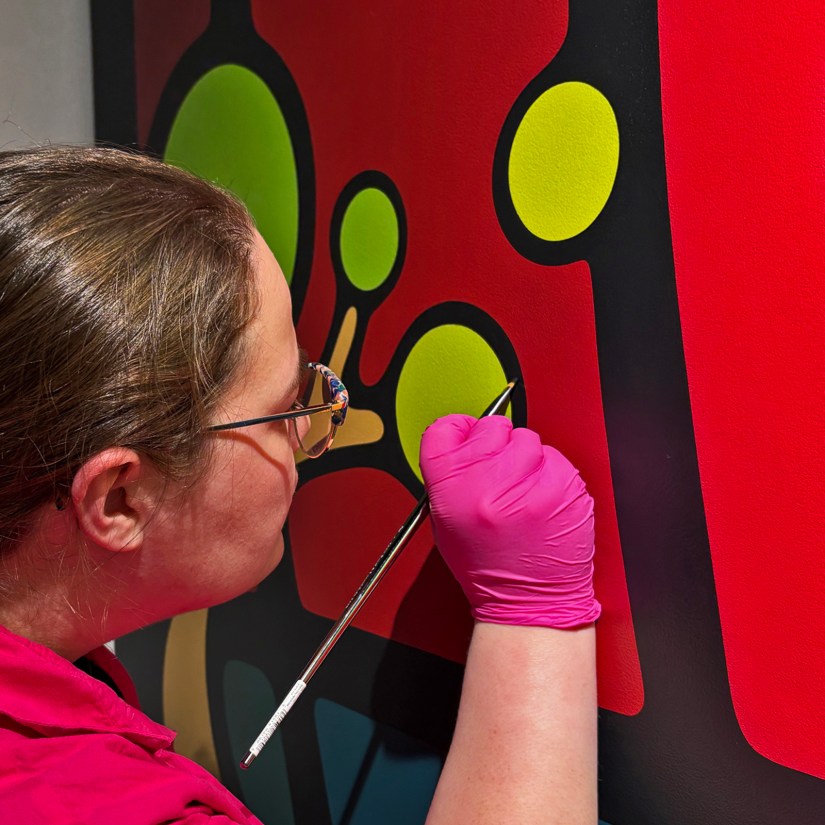
The contemporary kitchen is a social space, and murals have reemerged as a sophisticated and creative form of self-expression. Todayโ€™s hand-painted kitchen murals combine historical inspiration with contemporary design and technique.

Current Trends Reflect:

  • Nature and botanicals โ€” a nod to earlier folk traditions
  • Food and wine themes โ€” inspired by Roman and Tuscan frescoes
  • Minimalist line art โ€” echoing modern aesthetics
  • Cultural motifs โ€” celebrating heritage
  • Large-scale abstract murals โ€” turning kitchens into art installations

Artisans now use durable paints, sealants, and washable surfaces, allowing murals to stand up to heat, moisture, and daily use.

Why Hand-Painted Kitchen Murals Remain Desired

Across centuries, cultures, and artistic movements, kitchen murals have persisted because they provide:

  • A personal story: They connect the homeowner to heritage, memory, and meaning.
  • A sense of warmth: Art transforms a utilitarian space into a welcoming space.
  • A celebration of food and community: Murals reinforce the kitchenโ€™s emotional significance.
  • Timeless craftsmanship: Hand painting creates authenticity that printed murals canโ€™t fully replicate.

Final Thoughts

The history of hand-painted kitchen murals is a history of home, family, and creativity. From ancient frescoes to contemporary custom artwork, these murals have always served as more than decoration; they are symbols of nourishment, heritage, family, and the beauty of everyday life.

Contact Po, if youโ€™re ready to create a mural that sets your kitchen apart from your friends and families’ kitchens with a bold, contemporary, and hand-painted mural. Book your complimentary e-consultation and you can collaborate to design a wall that leaves a lasting impression and tells your story.

Request a Custom Project Quote

Let Me Know What You Think! Start or Join the Convesation

Artist Portia Po Chapman Mural, Portia Chapman, Uncategorized

Why Organic Colour Blocking Is Perfect for Kingston Homes

Colour Blocking in Kingston Hand Brushed Mural painted by Portia Po Chapman
Po painting a 6’D mural with a brush in Kingston.

Organic Colour-Blocking Murals in Kingston | Contemporary Hand-Painted Art by Po

Kingston homeowners are increasingly choosing original, hand-painted murals over traditional prints or wallpaper. Why? Contemporary interior design trends incorporate murals because they are more than decoration โ€” they are living, breathing elements of your home.

My style,ย organic colour blocking, uses precise brushwork to create vivid, flowing shapes and razor-sharp edges. Itโ€™s contemporary, sophisticated, and impossible to replicate digitally or with spray cans. Each mural interacts with the light, architecture, and atmosphere of your room.

Not sure what colour blocking is? See: History of Colour Blocking

Benefits of organic colour-block murals for Kingston homes:

  • Custom fit for your space: Every curve and colour is tailored to your room, wall, and lifestyle.
  • Adds personality: Your mural reflects your taste, energy, and story.
  • Timeless impact: Hand-painted murals remain striking for years, unlike printed designs that can fade or feel flat.

A mural in your foyer, living room, bedroom, or studio is more than art โ€” itโ€™s a statement. It changes how you feel in the room, how you move through the space, and how visitors experience your home.

Colour Blocking Hand Brush Painted Mural Kingston Residence
Colour Blocked Mural over Fireplace by Po in Kingston

Using a brush when painting a mural featuring colour blocking achieves crisp, opaque lines and shapes. It takes a painter many years of practice to produce sumptuous, flowing edges that are crisp and fluid. My own technique produces “flat” brush strokes that appear almost textureless.


The power of the murals I paint is the seamless connection with the viewer and the space – only achieved through exactness. The mind and soul immediately understand the imagery because without blurred edges, one need not interpret – just enjoy.

If youโ€™re ready to bring contemporary, hand-painted mural energy into your Kingston home, I can help design and create a space that feels alive, intentional, and completely unique.

Request a Custom Project Quote

Let Me Know What You Think! Start or Join the Convesation